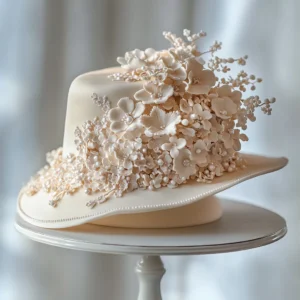
Dti Cake Hat
Create a stunning Dti Cake Hat with this step-by-step guide. A showstopping edible masterpiece, perfect for themed parties and special occasions!
Ingredients
For the Cake Base
- Choose a sturdy yet delicious cake that can hold its shape well when carved. Sponge cake butter cake, or pound cake are excellent options.
- 2 ½ cups all-purpose flour
- 2 teaspoons baking powder
- ½ teaspoon salt
- 1 cup unsalted butter softened
- 1 ¾ cups granulated sugar
- 4 large eggs
- 1 teaspoon vanilla extract
- 1 cup whole milk
For the Frosting and Structure
- This layer helps the fondant stick and adds a delicious creamy texture.
- 1 cup unsalted butter softened
- 4 cups powdered sugar
- 2 tablespoons heavy cream or milk
- 1 teaspoon vanilla extract
- A pinch of salt
For the Fondant and Decorations
- This is where the magic happens. Fondant creates the smooth polished look of the hat, while edible decorations add flair.
- 1 ½ pounds ready-to-roll fondant choose your color
- Edible food coloring for custom shades
- Edible pearls glitter, or sugar flowers for decoration
- Royal icing or edible glue to attach details
Tools You’ll Need
- Having the right tools makes shaping and decorating much easier.
- 6- inch and 9-inch round cake pans
- Cake turntable for even frosting application
- Offset spatula for smooth icing
- Rolling pin for fondant
- Hat-shaped mold or a serrated knife for carving
- Piping bags for detailing
- Food-safe paintbrush for adding finishing touches
Instructions
Step 1: Bake a Sturdy Cake Base
- A well-structured cake ensures stability for shaping and decorating.
- Preheat the oven to 350°F (175°C) and prepare both a 9-inch and 6-inch round cake pan by greasing and lining them with parchment paper.
- In a bowl, whisk together flour, baking powder, and salt to ensure even distribution of dry ingredients.
- In a large mixing bowl, cream butter and sugar until light and fluffy—this step aerates the batter for a stable yet soft texture.
- Add eggs one at a time, mixing well after each addition, followed by vanilla extract for flavor.
- Gradually add the dry ingredients in three parts, alternating with milk, and mix until just combined to avoid overmixing.
- Divide the batter evenly between the two pans, smoothing the tops with a spatula.
- Bake for 30-35 minutes, or until a toothpick inserted in the center comes out clean.
- Allow the cakes to cool for 10 minutes in the pans, then transfer them to a wire rack to cool completely.
Step 2: Carve and Shape the Hat
- Creating the perfect hat shape requires careful carving and layering.
- Place the 9-inch cake on a turntable or cake board to serve as the brim of the hat.
- Using a serrated knife, trim the edges slightly to create a gentle downward curve.
- Position the 6-inch cake in the center, forming the crown of the hat.
- Carve the top edges to achieve a smooth transition between the crown and the brim.
- Brush away any loose crumbs before applying frosting.
Step 3: Apply a Smooth Layer of Frosting
- A flawless frosting layer ensures the fondant adheres seamlessly.
- In a bowl, beat butter until smooth, then gradually add powdered sugar, heavy cream, and vanilla extract, mixing until light and creamy.
- Apply a thin crumb coat over the cake to trap any loose crumbs and create a smooth surface.
- Refrigerate the cake for 15-20 minutes to allow the crumb coat to set.
- Spread a final, even layer of frosting over the cake, smoothing it with an offset spatula.
Step 4: Cover the Cake with Fondant
- Fondant creates the polished, fabric-like effect that gives the cake its signature hat appearance.
- Dust a clean surface with powdered sugar and roll out the fondant to ¼-inch thickness.
- Carefully lift the fondant with a rolling pin and drape it over the cake.
- Smooth the fondant from the center outward, pressing gently to eliminate air pockets.
- Trim any excess fondant using a sharp knife for a neat finish.
Step 5: Decorate and Personalize
- Now it’s time to add the stylish details that make the Dti Cake Hat truly stand out.
- Use edible food coloring or luster dust to enhance the depth and color of the fondant.
- Attach decorative elements such as sugar flowers, edible pearls, or fondant ribbons using royal icing or edible glue.
- For a realistic fabric texture, gently press patterned mats or tools onto the fondant.
- Allow the cake to set for at least 30 minutes before serving to ensure all decorative elements stay in place.
Notes
Nutrition Information (Per Serving)
- Calories: 480 kcal
- Total Fat: 22g
- Saturated Fat: 12g
- Cholesterol: 85mg
- Sodium: 220mg
- Total Carbohydrates: 64g
- Sugars: 45g
- Protein: 5g