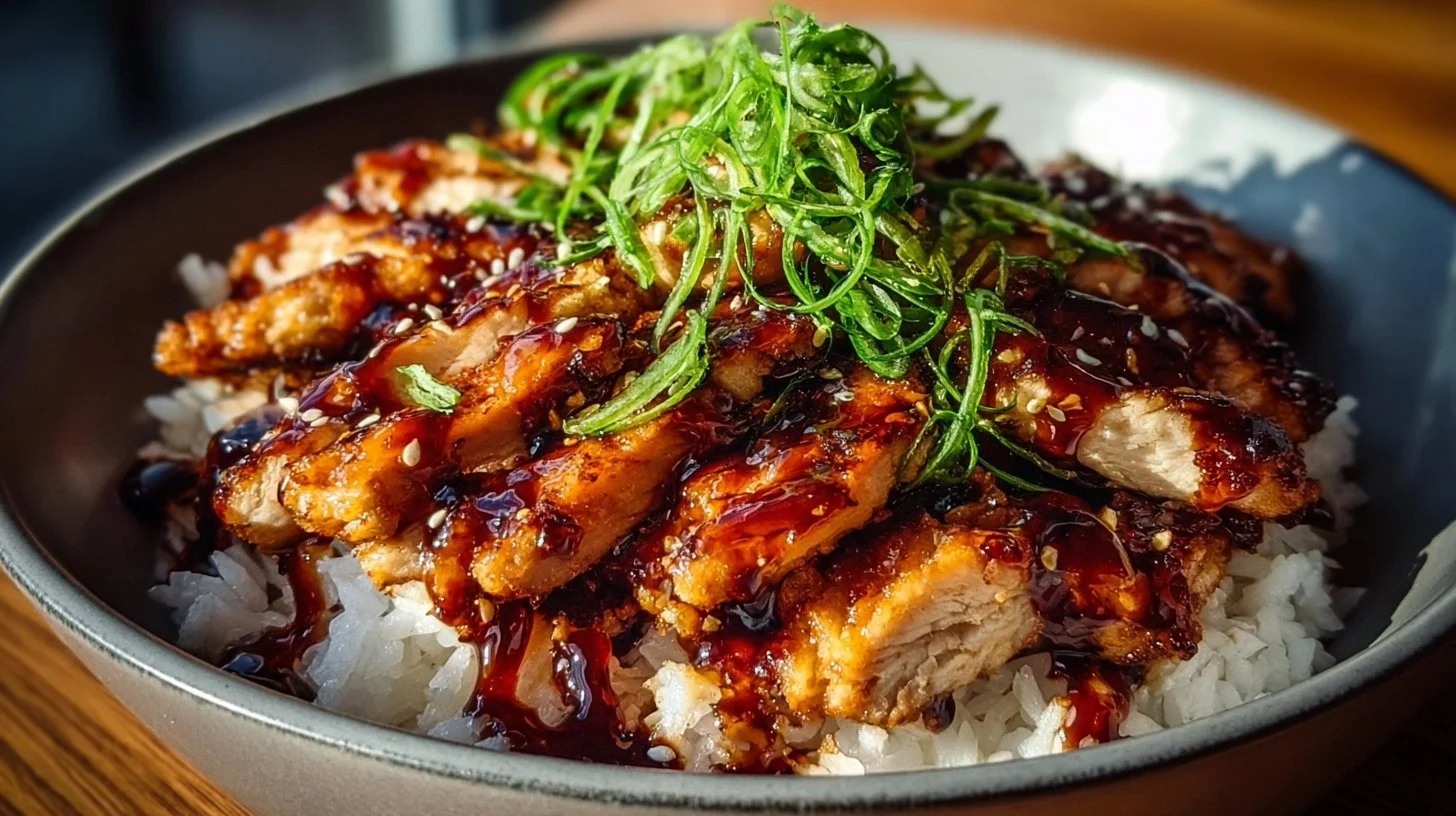
This Teriyaki Chicken recipe will quickly become a new favorite! In this one pan recipe, bite-size chicken breast pieces are sautéed in a skillet then coated with an easy and deliciously flavorful sauce.
This tastes just like your favorite Asian take-out but you can have this ready faster than the time it would take to go pick up take-out! No marinade required.
I’ve shared other teriyaki chicken recipes like my Grilled Teriyaki Chicken Bowl, but this hands down beats the prep and cook time on any other teriyaki chicken I’ve tried. And yet it tastes just as good! Plus it’s such a flavorful sauce so it doesn’t even require marinating.
It’s a (mostly) healthy recipe that comes in at an estimated 258 calories per serving, so it’s a smarter choice than the deep-fried food you usually get from your favorite Chinese take-out.
Why You’ll Love This Recipe
- Ready in 15 minutes – Faster than ordering take-out!
- One pan meal – Minimal cleanup for busy weeknights
- No marinating needed – The sauce is so flavorful you can skip the wait
- Better than takeout – Homemade always tastes fresher and you control the ingredients
- Family-friendly – Even picky eaters love this sweet and savory combination
- Healthier option – Only 258 calories per serving with 30g of protein
- Budget-friendly – Uses simple, affordable ingredients
- Versatile – Serve over rice, in lettuce wraps, or with your favorite veggies
“My son loves teriyaki chicken but he is super picky about it. I’ve tried so many recipes. I’ve used bottled teriyaki sauce. He has never really liked any that I have made until I made this tonight… He loves it!” – Tammy
How This Recipe Comes Together
This teriyaki chicken couldn’t be simpler! You’ll start by heating oil in a large skillet and adding bite-sized pieces of chicken breast. Let the chicken brown on the bottom for 3-4 minutes before flipping – this creates a nice golden exterior. While the chicken is cooking, whisk together your homemade teriyaki sauce in a small bowl. It’s just soy sauce, water, honey, brown sugar, rice vinegar, sesame oil, fresh ginger, garlic, and a bit of cornstarch to thicken.
Once the chicken is nearly cooked through (about 160°F internal temperature), pour the sauce right into the skillet. Toss everything together and let the sauce simmer for 30-60 seconds until it thickens into that gorgeous, glossy teriyaki coating. The cornstarch works its magic quickly, transforming the thin sauce into a thick, clingy glaze that coats every piece of chicken.
Serve it immediately over steamed rice with your favorite vegetables, and dinner is done! The whole process from start to finish takes just 15 minutes – that’s faster than most delivery!
Prep Time: 10 minutes
Cook Time: 10 minutes
Total Time: 15 minutes (ready in 20 minutes)
Ingredients
For the Chicken:
- 1¼ lbs boneless skinless chicken breasts, diced into 1-inch cubes
- 1 tablespoon olive oil
For the Teriyaki Sauce:
- ¼ cup low-sodium soy sauce
- ¼ cup water (or use 2 Tbsp water + 2 Tbsp Mirin for more flavor)
- 2 tablespoons honey
- 1½ tablespoons packed light brown sugar
- 1 tablespoon rice vinegar
- ¼ teaspoon toasted sesame oil
- 2 teaspoons peeled and minced fresh ginger
- 2 teaspoons peeled and minced fresh garlic (2 cloves)
- 2 teaspoons cornstarch
For Garnish (Optional):
- Sesame seeds
- Chopped green onions
Ingredient Notes:
Chicken breasts – Use boneless, skinless for quick cooking. Chicken thighs work great too, just cook a little longer. Cut into evenly-sized 1-inch pieces so they cook uniformly.
Olive oil – Vegetable oil or canola oil can be used instead.
Low-sodium soy sauce – Gives you control over salt levels. You can also use 2½ tablespoons standard soy sauce mixed with 1½ tablespoons water if that’s what you have.
Honey – Adds natural sweetness and helps create that glossy glaze. Can substitute with more brown sugar if needed.
Brown sugar – Light brown sugar is used here, but dark brown sugar or even granulated sugar works fine.
Rice vinegar – Provides a subtle tang. Apple cider vinegar works well too, or even lemon juice in a pinch.
Sesame oil – Has a bold, nutty flavor, so a little goes a long way. This can be omitted if you don’t have it, though it does add authentic flavor. Unrefined peanut oil can substitute.
Fresh ginger – Fresh is best for bright flavor! In a pinch, ½ teaspoon dried ground ginger can work.
Fresh garlic – Again, fresh is better, but 1 teaspoon dried granulated garlic will work.
Cornstarch – Critical for thickening the sauce into that perfect glaze consistency. Arrowroot starch can be substituted.
Equipment Needed
- Large 12-inch non-stick skillet or wok
- Small mixing bowl or liquid measuring cup
- Whisk
- Cutting board and sharp knife
- Measuring cups and spoons
Step-by-Step Instructions
Step 1: Heat the Oil
Heat 1 tablespoon olive oil in a 12-inch non-stick skillet over medium-high heat. Let the pan get hot before adding the chicken.
Step 2: Cook the Chicken
Add the diced chicken to the hot skillet in a single layer, giving space between pieces. Let it brown on the bottom without moving for about 3-4 minutes. This creates a nice golden crust.
Step 3: Flip and Continue Cooking
Flip the chicken pieces over and continue cooking until the center registers about 160°F on an instant-read thermometer, about 3 minutes longer. The chicken should be just cooked through but still juicy.
Step 4: Make the Sauce
While the chicken is cooking, whisk together all the sauce ingredients in a small mixing bowl: soy sauce, water, honey, brown sugar, rice vinegar, sesame oil, minced ginger, minced garlic, and cornstarch. Whisk until the cornstarch is completely dissolved with no lumps.
Step 5: Add the Sauce
Once the chicken is nearly cooked through, pour the sauce mixture directly into the skillet with the chicken.
Step 6: Thicken and Glaze
Continue to cook, tossing the chicken constantly, until the sauce has thickened into a glossy glaze. This takes about 30-60 seconds. The sauce will transform from thin and watery to thick and clingy.
Step 7: Serve
Remove from heat immediately and serve warm. Garnish with sesame seeds and chopped green onions if desired.
Yield: 4 servings
Best Ways to Serve Teriyaki Chicken
This versatile dish pairs beautifully with so many sides:
Classic Pairings:
- Over rice – White rice, brown rice, or jasmine rice are all perfect
- With steamed vegetables – Broccoli, asparagus, snap peas, or green beans
- Stir-fried vegetables – Bell peppers, carrots, and mushrooms
- Cauliflower rice – For a low-carb option
Bowl Ideas:
- Teriyaki chicken bowls – Rice + chicken + edamame + cucumber + avocado
- Rice and veggie bowls – Add roasted or steamed veggies
- Quinoa bowls – Use quinoa instead of rice for extra protein
- Salad bowls – Serve over mixed greens with Asian dressing
Other Serving Suggestions:
- Lettuce wraps – Wrap in butter lettuce leaves with shredded carrots
- Over noodles – Lo mein noodles, rice noodles, or even spaghetti
- In tacos – Use as a filling for Asian-fusion tacos
- With fried rice – Serve alongside or mixed into fried rice
- Meal prep containers – Portion with rice and veggies for easy lunches
Side Dish Ideas:
- Egg rolls or spring rolls
- Pot stickers or dumplings
- Asian cucumber salad
- Sesame noodles
- Miso soup
- Edamame
Garnish Options:
- Sesame seeds (black or white)
- Sliced green onions
- Fresh cilantro
- Crushed peanuts
- Red pepper flakes for heat
- Lime wedges
Storage and Reheating Tips
Refrigerator Storage: Store leftover teriyaki chicken in an airtight container in the refrigerator for up to 4 days. Keep the chicken separate from rice if possible, as they reheat better separately.
Reheating Instructions:
Stovetop (Best method): Heat a skillet over medium heat with a splash of water or chicken broth. Add the chicken and toss until heated through, about 3-5 minutes. This keeps the chicken moist.
Microwave: Place chicken in a microwave-safe dish and cover with a damp paper towel. Microwave on 50% power in 30-second intervals, stirring between each, until heated through. This prevents overcooking.
Oven: Spread chicken on a baking sheet, cover with foil, and reheat at 350°F for 10-15 minutes until warmed through.
Freezer Storage: Freeze cooled teriyaki chicken in freezer-safe containers or bags for up to 3 months. For best results, freeze the chicken and sauce together.
Thawing and Reheating from Frozen: Thaw overnight in the refrigerator, then reheat using one of the methods above. You can also reheat from frozen in the microwave on defrost setting, followed by regular heating.
Important Tips:
- Don’t overheat or the chicken will become dry and rubbery
- Add a splash of water, broth, or extra teriyaki sauce when reheating to keep it moist
- The sauce may thicken further when stored; thin with a bit of water if needed
Expert Tips for Perfect Teriyaki Chicken
- Cut chicken evenly – Work to cut chicken into evenly-sized 1-inch pieces so they cook uniformly
- Don’t overcrowd the pan – If your skillet isn’t large enough, cook the chicken in two batches for better browning
- Don’t move the chicken too soon – Let it brown on one side before flipping for the best color and flavor
- Watch the temperature – Cook until chicken reaches 160°F internal temperature. Don’t overcook or it will dry out
- Prep the sauce while chicken cooks – Multitask to keep this a true 15-minute meal
- Dissolve cornstarch completely – Whisk the sauce well to avoid cornstarch lumps
- Let sauce simmer – Give it 30-60 seconds to thicken properly and cook off any cornstarch flavor
- Adjust seasoning – If you prefer less salt, replace some soy sauce with water. For more saltiness, add a pinch of salt
- Use Mirin for authentic flavor – Replace 2 tablespoons of the water with Mirin (Japanese sweet rice wine) for more complex flavor
- The sesame oil is optional – The dish is still delicious without it, but it does add authentic Asian flavor
Creative Variations
Protein Swaps:
- Chicken thighs – Use instead of breasts for juicier, more flavorful meat (cook 2-3 minutes longer)
- Shrimp – Cook for 2-3 minutes per side until pink
- Salmon – Cut into cubes and cook gently
- Tofu – Use extra-firm tofu, pressed and cubed, for a vegetarian version
- Pork – Pork tenderloin works beautifully
- Beef – Use sirloin or flank steak, thinly sliced
Vegetable Additions:
- Stir in broccoli florets during the last 2 minutes of cooking
- Add snap peas or snow peas with the sauce
- Include sliced bell peppers and onions
- Toss in mushrooms for earthy flavor
- Add water chestnuts for crunch
Flavor Twists:
- Spicy teriyaki – Add 1-2 teaspoons sriracha or red pepper flakes
- Orange teriyaki – Add 2 tablespoons orange juice and 1 teaspoon orange zest
- Pineapple teriyaki – Stir in fresh pineapple chunks
- Ginger-forward – Double the fresh ginger
- Garlic lovers – Increase garlic to 4-5 cloves
Sauce Adjustments:
- Thicker sauce – Use 1 tablespoon cornstarch instead of 2 teaspoons
- Thinner sauce – Use 1 teaspoon cornstarch or add more water
- Sweeter – Increase honey or brown sugar by 1-2 tablespoons
- Less sweet – Reduce honey and brown sugar by half
- More tangy – Add extra rice vinegar or a splash of lime juice
Cooking Method Variations:
- Slow cooker – Place chicken and sauce in slow cooker, cook on low 4 hours (omit cornstarch until end)
- Instant Pot – Pressure cook for 8 minutes, then add cornstarch slurry
- Grilled – Marinate chicken in sauce, grill, and serve with extra sauce
- Baked – Bake at 400°F for 20-25 minutes, adding sauce for last 5 minutes
Frequently Asked Questions
Can I use chicken thighs instead of chicken breasts? Absolutely! Chicken thighs are excellent in this recipe. They’re more flavorful and stay juicier than breasts. Just cook them for 2-3 minutes longer since thighs take a bit more time to cook through. Check that they reach 165°F internal temperature.
Do I need to marinate the chicken first? No marinating required! That’s one of the best parts of this recipe. The sauce is so flavorful that it doesn’t need time to penetrate the meat. You can get dinner on the table in 15 minutes without any advance prep.
Can I make this gluten-free? Yes! Simply substitute tamari or gluten-free soy sauce for the regular soy sauce. Make sure all other ingredients (like vinegar and cornstarch) are certified gluten-free if you’re celiac or highly sensitive.
Why is my sauce not thickening? The most common reasons are: (1) Not letting it simmer long enough – give it a full 30-60 seconds, (2) The heat is too low – make sure the pan is hot enough to activate the cornstarch, (3) Cornstarch wasn’t dissolved properly – whisk thoroughly before adding. If your sauce still won’t thicken, mix 1 teaspoon cornstarch with 1 tablespoon cold water and stir it in.
Can I use bottled teriyaki sauce instead? You can, but homemade tastes so much better and you control the sodium and sugar levels. Plus, it only takes 2 minutes to whisk together! If you do use bottled, skip all the sauce ingredients and just add ½ cup bottled teriyaki sauce. Heat until warmed through.
How do I keep the chicken from getting dry? The key is not to overcook it. Remove the chicken from heat as soon as it reaches 160°F (it will continue to cook to 165°F as it rests). Also, cutting the chicken into evenly-sized pieces helps ensure nothing gets overcooked while waiting for other pieces to finish.
Can I make this ahead of time? The chicken is best served fresh, but you can prep ingredients ahead. Cut the chicken and mix the sauce, storing both in the refrigerator. When ready to cook, it takes just 10 minutes. Leftovers reheat well for meal prep!
What can I substitute for sesame oil? Sesame oil can be omitted entirely – the recipe is still delicious without it. For a substitute, try unrefined peanut oil (use double the amount) or add a bit more rice vinegar. The sesame oil adds nutty depth but isn’t critical.
Is this keto-friendly? As written, no – it contains honey and brown sugar. For a keto version, substitute the honey and brown sugar with a low-carb sweetener like erythritol or monk fruit (start with 2-3 tablespoons and adjust to taste). The carbs will drop significantly.
Can I double this recipe? Yes! Just make sure you have a large enough skillet (at least 14 inches) or cook the chicken in two batches. Overcrowding the pan will cause the chicken to steam instead of brown.
Prep Time: 10 minutes
Cook Time: 10 minutes
Total Time: 15 minutes
Servings: 4
Course: Main Course
Cuisine: Japanese
Nutrition Information (Per Serving)
- Calories: 258 kcal
- Protein: 30g
- Carbohydrates: 15g
- Fat: 7g
- Sugar: 13g
- Sodium: 698mg
Did you try this recipe? Rate it below and let me know how it turned out in the comments!
Print
Teriyaki Chicken
- Total Time: 15 minutes
- Yield: 4 servings
- Diet: None
Description
A quick and easy one-pan teriyaki chicken recipe that rivals your favorite take-out. Ready in just 15 minutes with no marinating required.
Ingredients
- 1¼ lbs boneless skinless chicken breasts, diced into 1-inch cubes
- 1 tablespoon olive oil
- ¼ cup low-sodium soy sauce
- ¼ cup water (or use 2 Tbsp water + 2 Tbsp Mirin for more flavor)
- 2 tablespoons honey
- 1½ tablespoons packed light brown sugar
- 1 tablespoon rice vinegar
- ¼ teaspoon toasted sesame oil
- 2 teaspoons peeled and minced fresh ginger
- 2 teaspoons peeled and minced fresh garlic (about 2 cloves)
- 2 teaspoons cornstarch
- Sesame seeds (for garnish)
- Chopped green onions (for garnish)
Instructions
- Heat 1 tablespoon olive oil in a 12-inch non-stick skillet over medium-high heat.
- Add the diced chicken to the hot skillet and let it brown on one side for about 3-4 minutes.
- Flip the chicken pieces over and cook for an additional 3 minutes until cooked through (160°F internal temperature).
- While the chicken cooks, whisk together soy sauce, water, honey, brown sugar, rice vinegar, sesame oil, minced ginger, minced garlic, and cornstarch in a small bowl.
- Once the chicken is nearly cooked, pour the sauce mixture into the skillet.
- Continue tossing the chicken until the sauce thickens, about 30-60 seconds.
- Remove from heat and serve immediately with garnish.
Notes
Serve over rice or in lettuce wraps. This dish pairs well with steamed vegetables or stir-fried options.
- Prep Time: 10 minutes
- Cook Time: 10 minutes
- Category: Main Course
- Method: Sautéing
- Cuisine: Japanese